Why I built Snapper for Windows
7 min read
I needed a simple Windows tool that could turn a raw screenshot into an image ready for a post.
Why I built a Windows screenshot editor
I often needed to share a screenshot in a post. The Windows capture tool made the first step easy, but a raw image was not always ready for social media.
A screenshot can need space around the content so it does not touch the edge of the post. A quiet background can separate the window from the page. Rounded corners and a controlled shadow can make the application easier to see when the final image is small.
I could make these changes in a large design tool, but I had to repeat the same setup for every image. I wanted a small Windows tool for the path from capture to export. I could not find one that fit that process, so I built Snapper.
Snapper does not replace a full image editor. It starts with a screenshot and ends with an image that is ready to publish. That limit helped me decide which controls belonged in the application.
The goal was not to hide a weak screenshot behind decoration. The tool should preserve the captured interface and give it enough structure to work as a post image.
The capture flow had to stay familiar
Win + Shift + S is already the normal capture shortcut for many Windows users. I did not want Snapper to require a new habit before it became useful.
The application detects a native Windows snip and opens the captured image in the editor. Ctrl + Shift + S provides a second shortcut for a full-screen capture. Both paths lead to the same canvas.
Snapper can stay in the system tray while it waits. The main window does not need to remain open on the desktop. It appears when the user has an image to prepare.
This integration keeps the start of the process short. The user selects an area with a known Windows tool, then gets the controls that the native capture flow does not provide.
A manual open action is still useful for an older capture. The editor should not depend on the shortcut when the image already exists on disk or in the clipboard.
The canvas uses a small set of controls
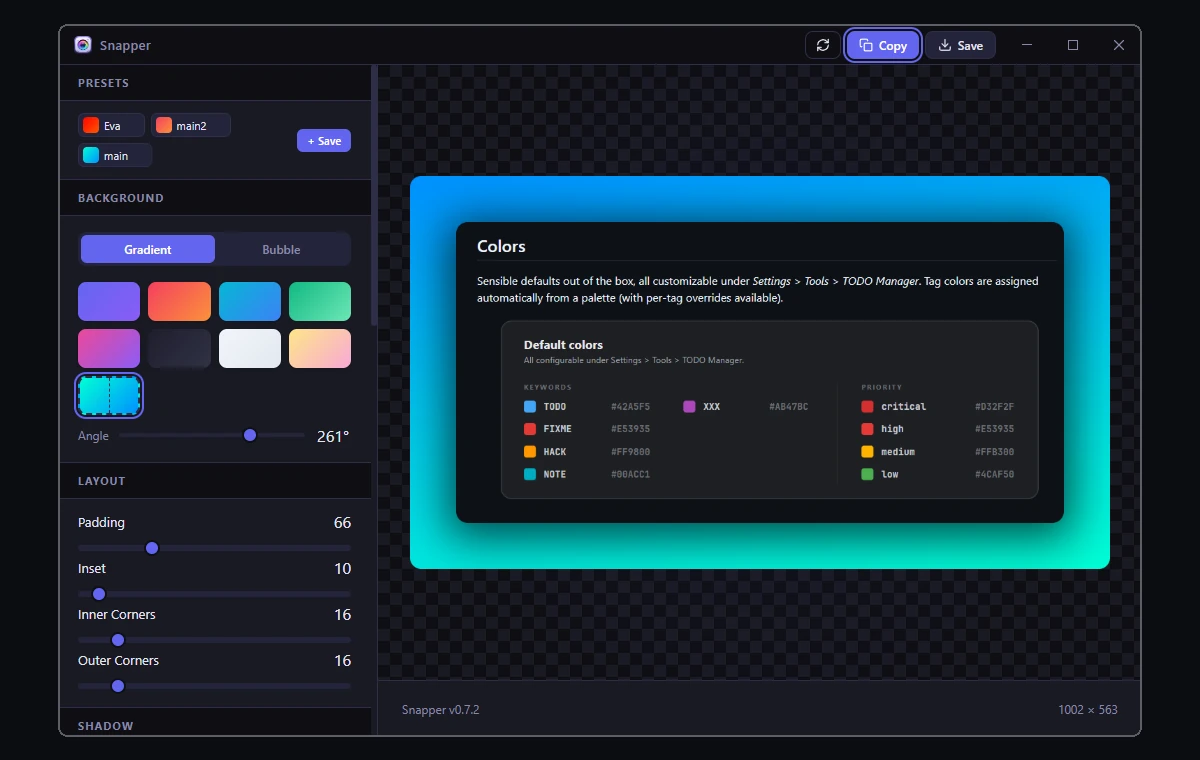
The editor places the settings beside a live canvas. A value changes the preview at once, so there is no separate preview dialog and no guess about the final layout.
The canvas has two main parts: the screenshot and the area around it. Padding controls the outer space. Inset adjusts the space close to the screenshot. Separate corner values control the captured window and the outer card.
Backgrounds can use a solid color, a custom image, or a two-color linear gradient with an angle. Snapper also includes twelve mesh gradient presets with aurora and cloud-like color patterns.
The presets provide a useful base, but the screenshot remains the main content. A background should support the application window instead of competing with it. For busy screenshots, a simple color often works better than a strong gradient.
A shadow gives the screenshot distance from the background. Snapper has controls for spread, blur, horizontal offset, vertical offset, and color. These separate values make it possible to use a soft shadow on light or dark output.
I used one canvas model for the live preview and the final render. This reduces the chance that a corner or shadow moves when the user exports the image.
Post sizes change the layout
One screenshot may need several output shapes. A wide image can work on a portfolio page, while a square version can fit a different social feed. Repeating the full edit for each target wastes time.
Snapper includes free size, 1:1, 4:3, 16:9, X, Instagram, and LinkedIn ratios. The user selects the target, and the canvas changes the background area while it keeps the screenshot inside the frame.
The screenshot should not be cropped without warning when the ratio changes. Padding and inset must scale within the available area. The preview therefore matters as much as the numeric controls.
A watermark can add a name, account, or short source label to the final image. The user can change its position and opacity so it does not cover important interface content. It remains optional because many screenshots do not need a label.
These controls are meant for post preparation, not page design. Snapper does not provide free-form text boxes, layers, or drawing tools. A full editor is still the right choice when the image needs a custom composition.
A ratio preset is a starting point rather than a promise about every social network. Platform layouts can change, so the visible canvas size remains the final value that the user should check.
Presets remove repeated work
The same visual settings often work for a group of screenshots. A project may use one background, corner size, and shadow in every release post.
Snapper saves the current settings as a named preset in local storage. A user can select it for the next capture or overwrite it when the design changes.
A preset stores the setup, but it does not lock the image. The user can load a known base and adjust one value for the new screenshot. This is faster than rebuilding the full style and safer than relying on memory.
I kept presets local because they are personal editor settings. They do not need an account or a remote service. This also lets the application work without a network connection.
The practical flow is short: capture an image, select a preset, check the spacing, and export. Each step remains visible, and the user can still change every stored value.
Named presets also make experiments safer. I can try a new background without losing the setup that I use for normal project images.
Export must match the preview
The final image can go directly to the clipboard. This is the shortest path when the user wants to paste it into a post, message, or document.
Snapper can also save PNG, JPG, or WebP files. PNG keeps interface text and edges sharp. JPG can reduce the size of image-heavy captures. WebP provides another compact output for websites.
The exported file must use the same crop, background, spacing, corners, shadow, and watermark that the preview shows. A different result after saving would make the live canvas unreliable.
Export also needs a clear output size. An aspect-ratio choice is not enough if the saved file has unexpected dimensions. The editor shows the current canvas size so the user can check it before saving.
Copy and file export share the same rendered result. This avoids two output paths that can develop small differences over time.
Format choice stays close to the save action. The user can choose the file type for the destination instead of changing a global preference before each export.
A desktop tool must work with Windows
Snapper runs in a native desktop window with WebView2. The interface uses web technology, while the host application connects it to Windows capture, clipboard, startup, and tray features.
An optional auto-start setting adds the application to Windows login through the registry. Users can leave it off when they only need Snapper for specific work.
The tray gives access to the editor while the main window is closed. These details do not change an image, but they decide whether the tool fits into a normal capture routine.
The project taught me that a narrow desktop tool still needs a complete workflow. Capture, preview, saved presets, clipboard access, file export, and background operation have to agree. A fault between two steps can make the full tool feel unreliable.
Snapper remains deliberately small. It does not try to edit photographs or replace a design application. It gives me the controls I need to turn a Windows screenshot into a clean image for a portfolio, release note, or social post, then gets out of the way.
That narrow purpose is also how I judge new features. If a feature does not shorten screenshot preparation or improve the exported result, it probably belongs in another tool.